
| 일 | 월 | 화 | 수 | 목 | 금 | 토 |
|---|---|---|---|---|---|---|
| 1 | 2 | 3 | 4 | |||
| 5 | 6 | 7 | 8 | 9 | 10 | 11 |
| 12 | 13 | 14 | 15 | 16 | 17 | 18 |
| 19 | 20 | 21 | 22 | 23 | 24 | 25 |
| 26 | 27 | 28 | 29 | 30 | 31 |
- IOU
- detr
- object queries
- Average Precision
- YOLO
- Object Detection metric
- Fast R-CNN
- RPN
- pytorch
- Anchor box
- AP
- Hungarian algorithm
- Darknet
- herbwood
- hard negative mining
- Map
- RoI pooling
- multi task loss
- R-CNN
- Multi-task loss
- Object Detection
- Non maximum suppression
- Detection Transformer
- mean Average Precision
- fine tune AlexNet
- BiFPN
- Linear SVM
- Faster R-CNN
- Region proposal Network
- Bounding box regressor
- Today
- Total
약초의 숲으로 놀러오세요
Pytorch로 구현한 YOLO v1 모델 본문
이번 포스팅에서는 pytorch로 구현한 YOLO v1 모델의 코드를 분석해보도록 하겠습니다. 코드 구현체를 찾다가 우연히 Aladdin Persson님이 올리신 "Pytorch YOLO From Scratch" 영상을 보게 되었는데 설명이친절하고 코드가 깔끔하여 참고하기 좋다는 생각을 하게 되었습니다. aladdinpersson님의 github repository에 올라온 코드를 보면서 YOLO v1 모델의 전체적인 학습 과정을 살펴보도록 하겠습니다. 해당 모델에 대한 설명은 YOLO v1 논문 리뷰 포스팅을 참고하시기 바랍니다.
1) DarkNet
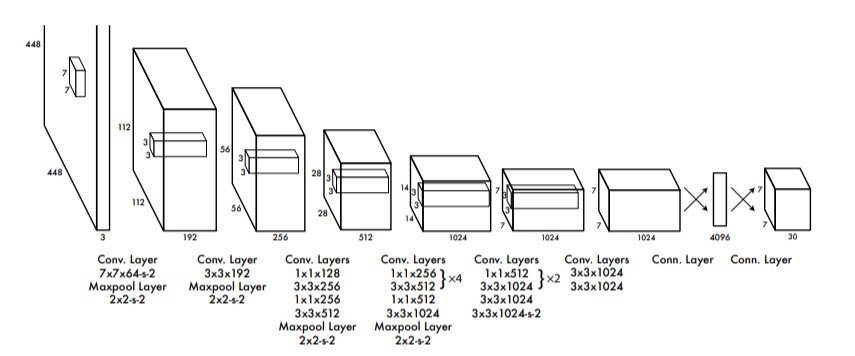
전체적인 network를 설계하는 과정은 단순합니다. 위의 그림과 같이 network의 최종 feature map의 크기가 7x7x30이 되도록 설계합니다. 구현하는 과정에서 흥미로웠던 점은 network의 각 conv layer의 하이퍼파라미터값을 config 변수에 저장한 후 이를 불러와 사용했다는 점입니다.
architecture_config = [
    # Tuple : (kernel_size, num_filters, stride, padding)
    (7, 64, 2, 3),
    "M",
    (3, 192, 1, 1),
    "M",
    (1, 128, 1, 0),
    (3, 256, 1, 1),
    (1, 256, 1, 0),
    (3, 512, 1, 1),
    "M",

    # List : tuples and then last integer represents number of repeats
    [(1, 256, 1, 0), (3, 512, 1, 1), 4],
    (1, 512, 1, 0),
    (3, 1024, 1, 1),
    "M",
    [(1, 512, 1, 0), (3, 1024, 1, 1), 2],
    (3, 1024, 1, 1),
    (3, 1024, 2, 1),
    (3, 1024, 1, 1),
    (3, 1024, 1, 1),
]
위의 코드에서 볼 수 있듯이 architecture_config 리스트의 각 요소는 conv layer의 하이퍼파라미터인 (kernel_size, num_filters, stride, padding)이 튜플 형식으로 저장되어 있습니다. config 리스트의 요소 중에 "M" 문자열은 max pooling을 의미합니다. 리스트 요소는 마지막 정수값만큼 layer를 반복함을 의미합니다.
해당 코드에서는 architecture_config 리스트 요소의 type에 따라 조건문으로 서로 다른 layer를 추가함으로써 모델을 설계합니다. 가령 리스트의 요소가 튜플일 경우 해당 하이퍼파라미터에 맞는 conv layer를, 문자열일 경우 max pooling을, 리스트일 경우 마지막 정수값만큼 layer를 반복하여 전체적인 모델을 구성합니다. 자세한 코드는 aladdinpersson님의 github repository의 model.py를 참고하시기 바랍니다.
2) YOLO loss function
사실 이번 코드 분석에서 중점적으로 살펴봐야할 부분은 loss function을 구현한 코드라고 생각합니다. 구현하는 부분에서 최종 feature map에 대하여 처리해줘야 할 과정들이 몇 가지 있기 때문에 반드시 짚고 넘어가야할 것 같습니다.
class YoloLoss(nn.Module):
    def __init__(self, S=7, B=2, C=20):
        super(YoloLoss, self).__init__()
        self.mse = nn.MSELoss(reduction='sum')
        self.S = S
        self.B = B
        self.C = C
        self.lambda_noobj = 0.5
        self.lambda_coord = 5
우선 loss function을 클래스로 정의하여 grid의 크기 S, grid cell별 예측 bounding box의 수 B, 예측하는 class의 수 C를 생성자로 받습니다. 또한 가중치 파라미터인 $\lambda_{noobj}$, $\lambda_{coord}$도 지정해줍니다.
 (...)
    def forward(self, predictions, target):
      predictions = predictions.reshape(-1, self.S, self.S, self.C + self.B*5)

      iou_b1 = intersection_over_union(predictions[..., 21:25], target[..., 21:25])
      iou_b2 = intersection_over_union(predictions[..., 26:30], target[..., 21:25])
      ious = torch.cat([iou_b1.unsqueeze(0), iou_b2.unsqueeze(0)], dim=0)

      iou_maxes, bestbox = torch.max(ious, dim=0)

      exists_box = target[..., 20].unsqueeze(3) # Iobj_i : object in cell i?

        (...)
그 다음 forward pass 시 처리할 과정을 정의합니다. 우선 각 grid cell마다 2개의 bounding box를 예측하고 그 중 confidence score가 높은 1개의 boundig box를 학습에 사용하는 과정을 살펴보도록 하겠습니다. predictions 파라미터는 network가 최종적으로 산출하는 7x7x30 크기의 feature map을 flatten한 결과입니다. predictions는 각 grid cellㅇ 산출한 [c1, c2, ..., c20, p_c1, x, y, w, h, p_c2, x, y, w, h]와 같은 정보가 30개 포함하고 있습니다. 자세한 내용은 YOLO v1 논문 리뷰를 참고하시기 바랍니다. 이를 7x7x30의 크기로 reshape시켜줍니다.
predictions[..., 21:25]는 첫 번째 bounding box의 좌표값을, predictions[..., 26:30]은 두 번째 bounding box의 좌표값을 의미합니다. 이를 정답에 해당하는 target의 좌표값과 비교하여 각각 IoU를 계산합니다. best_box 변수에는 두 bounding box 중 IoU 값이 더 큰 box의 index가 저장됩니다. 이후 target[..., 20]를 통해 해당 grid cell에 ground truth box의 중심이 존재하는지 여부를 확인합니다. 만약 존재한다면 exists_box = 1, 존재하지 않는다면 exists_box = 0 이 될 것입니다.
(...)
box_predictions = exists_box * (
(
bestbox * predictions[..., 26:30]
+ (1 - bestbox) * predictions[..., 21:25]
)
)
box_targets = exists_box * target[..., 21:25]
box_predictions[..., 2:4] = torch.sign(box_predictions[..., 2:4]) * torch.sqrt(
torch.abs(box_predictions[..., 2:4] + 1e-6)
)
box_targets[..., 2:4] = torch.sqrt(box_targets[..., 2:4])
box_loss = self.mse(
torch.flatten(box_predictions, end_dim=-2),
torch.flatten(box_targets, end_dim=-2)
)
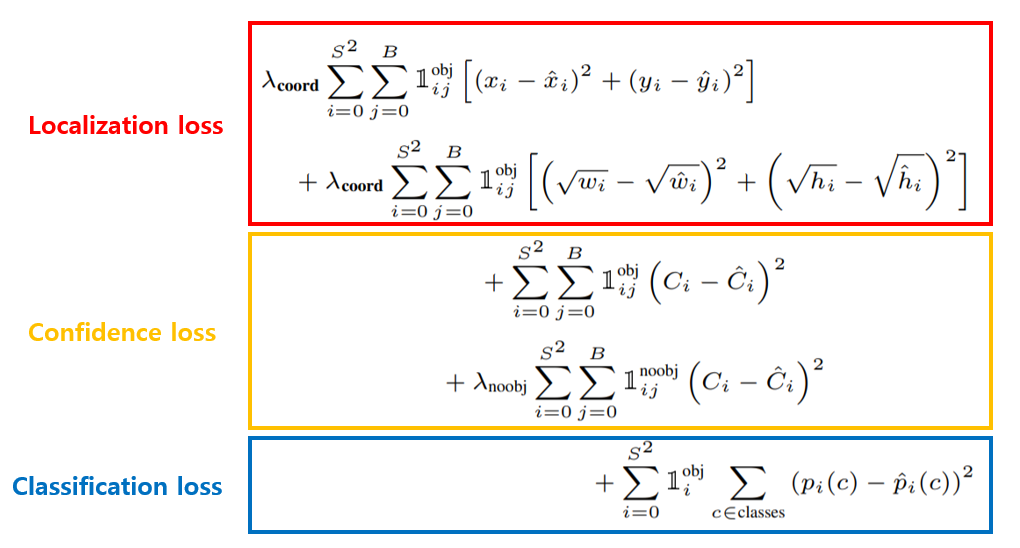
(...)먼저 Localization loss를 계산해줍니다. best_box 변수를 활용하여 실제 bounding box 예측 중 IoU 값이 더 큰 box를 최종 예측으로 사용합니다. 그리고 width, height 값에는 루트를 씌워줍니다. 이후 bounding box 좌표값에 대하여 mean squared error loss를 계산합니다.
 (...)
        pred_box = (
            bestbox * predictions[..., 25:26] + (1 - bestbox) * predictions[..., 20:21]
        )

        # (N*S*S)
        object_loss = self.mse(
            torch.flatten(exists_box * pred_box),
            torch.flatten(exists_box * target[..., 20:21])
        )
          no_object_loss = self.mse(
            torch.flatten((1 - exists_box) * predictions[..., 20:21], start_dim=1),
            torch.flatten((1 - exists_box) * target[..., 20:21], start_dim=1)
        )

        no_object_loss += self.mse(
            torch.flatten((1 - exists_box) * predictions[..., 25:26], start_dim=1),
            torch.flatten((1 - exists_box) * target[..., 20:21], start_dim=1)
        )
  (...)
다음으로 Confidence loss를 구현한 부분을 살펴보도록 하겠습니다. 먼저 object가 실제로 존재할 경우의 confidence loss부터 구해줍니다. predictions[..., 25:26]은 첫 번째 box의 confidence score를, predictions[..., 20:21]은 두 번째 box의 confidence score를 의미합니다.위의 코드를 보면 exists_box 변수를 통해 grid cell에 할당된 ground truth box의 중심이 있는 경우에만 loss를 구한다는 것을 확인할 수 있습니다.
다음으로 object가 없을 경우의 confidence loss를 구하는 과정을 살펴보겠습니다. 이 경우 두 bounding box를 모두 학습에 참여시킵니다.
 (...)
        class_loss = self.mse(
            torch.flatten(exists_box * predictions[..., :20], end_dim=-2),
            torch.flatten(exists_box * target[..., :20], end_dim=-2)
        )

        loss = (
            self.lambda_coord * box_loss # first two rows in paper
            + object_loss # third row in paper
            + self.lambda_noobj * no_object_loss # fourth row
            + class_loss # fifth row
        )

        return loss
마지막으로 Class loss를 구해줍니다. 위와 같이 predictions[..., :20]에 해당하는, 즉 20개의 class의 score를 target과 비교하여 mse loss를 구합니다.
이후 YoloLoss 생성자에서 정의 가중치 파라미터 $\lambda_{coord}$를 localization loss에 곱해주고 $\lambda_{noobj}$를 no object confidence loss에 곱해줍니다. 이후 localization loss, confidence loss, class loss를 모두 더해 최종 loss를 구합니다.
3) Custom Dataset
마지막으로 살펴볼 부분은 Custom Dataset을 정의하는 부분입니다. 이 부분에서 이미지의 각 grid cell에 ground truth box의 중심이 있는지 지정해줍니다.
class VOCDataset(torch.utils.data.Dataset):
    def __init__(
            self, csv_file, img_dir, label_dir, S=7, B=2, C=20, transform=None):
        (...)

    def __getitem__(self, index):
        (...)
        label_matrix = torch.zeros((self.S, self.S, self.C + 5*self.B))
        for box in boxes:
            class_label, x, y, width, height = box.tolist()
            class_label = int(class_label)

            # x, y의 위치 grid cell 파악하기
            i, j = int(self.S * y), int(self.S * x)
            x_cell, y_cell = self.S * x - j, self.S * y - i
            width_cell, height_cell = (
                    width * self.S,
                    height * self.S
            )

            if label_matrix[i, j, 20] == 0:
                label_matrix[i, j, 20] = 1
                box_coordinates = torch.tensor(
                    [x_cell, y_cell, width_cell, height_cell]
                )
                label_matrix[i, j, 21:25] = box_coordinates
                label_matrix[i, j, class_label] = 1

        return image, label_matrix
__getitem__ 메서드 부분에서 label_matrix 변수는 grid cell와 같은 7x7x30 크기의 배열입니다. 만약 ground truth box의 중심이 특정 cell에 존재할 경우 해당 cell의 20번째 index(confidence score) 값을 1로 지정합니다. boxes 변수에는 전체 ground truth box의 [x, y, w, h]가 저장되어 있습니다. 각각의 ground truth box를 순회하면서 ground truth box의 중심 좌표를 계산한 후 label_matrix에 confidence score와 bounding box의 좌표를 저장합니다. 위와 같이 Custom Dataset을 정의할 때 각 grid cell별로 object가 존재하는지 여부를 파악하여 loss function을 계산할 때 활용할 수 있습니다.
지금까지 pytorch로 구현한 YOLO v1 모델의 코드를 살펴봤습니다. 모델을 학습시키는 과정은 쉽게 이해할 수 있기 때문에 설명을 생략했습니다. loss function을 정의하는 부분에서 index parameter를 사용하는 부분이 상당히 흥미로웠습니다. network가 단순하기 때문에 상대적으로 구현된 코드를 이해하기 쉬웠던 것 같습니다.
Reference
Aladding Persson님의 "Pytorch YOLO From Sratch" 유튜브 영상
'Computer Vision > Code Review' 카테고리의 다른 글
| Pytorch로 구현한 Faster R-CNN 모델 (8) | 2020.12.23 |
|---|---|
| Pytorch로 구현한 Fast R-CNN 모델 (2) | 2020.12.10 |
| Pytorch로 구현한 R-CNN 모델 (9) | 2020.11.28 |
| Python으로 구현한 mAP(mean Average Precision) (2) | 2020.11.19 |


